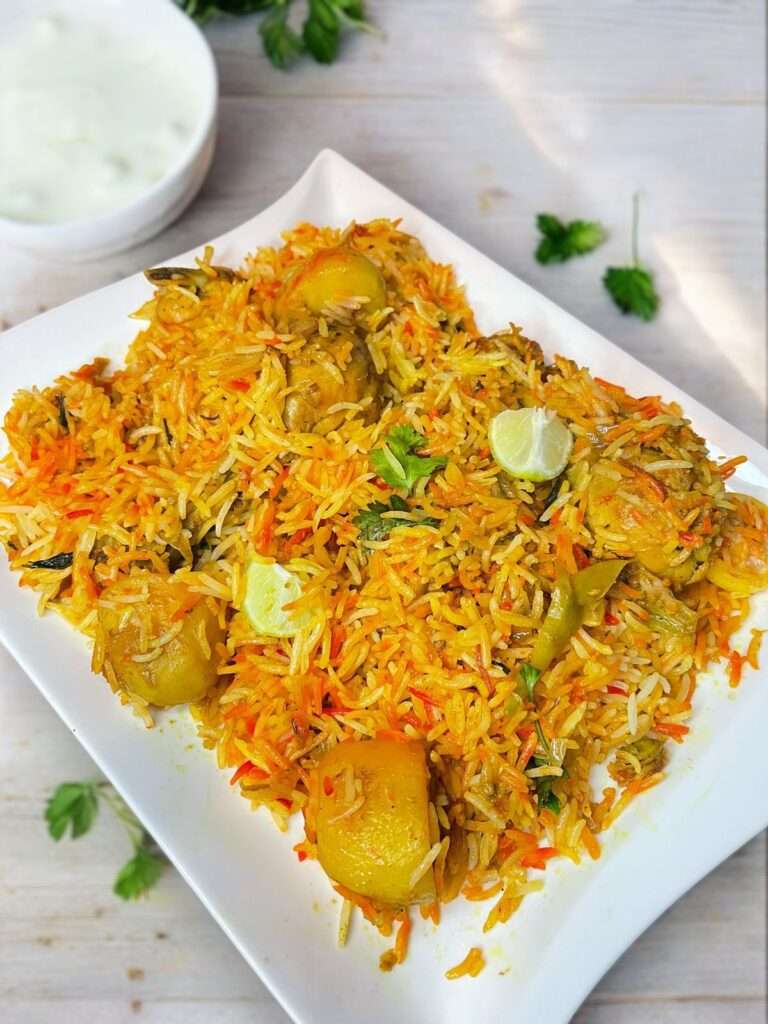
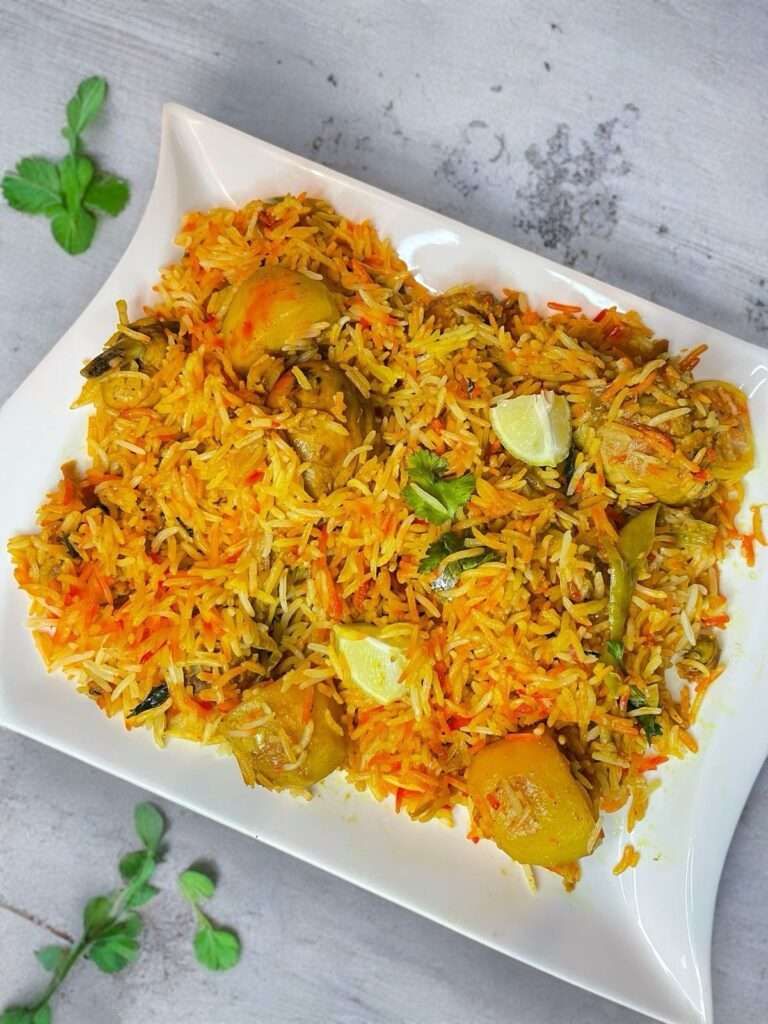
This recipe is what you’d call an authentic Pakistani Chicken Biryani, and I promise you, it’s amazing! Don’t worry if you’re not an experienced cook, this detailed recipe makes it super easy to prepare, and the flavors are out of this world. Every single grain of rice is full of spices.
I really mean it when I say you have to try this recipe for yourself! Gather your ingredients, follow the simple steps, and you’ll see just how rewarding it is to whip up your own chicken biryani. Your friends and family will be so impressed! 😉
About The Recipe
Did you know “biryani” comes from the Persian word “birian,” meaning “fried before cooking”! It started in Persian kitchens and evolved into the beloved dish we enjoy today in South Asia, especially in Pakistan and India.
In Pakistan, particularly in Karachi, biryani isn’t just a meal, it’s a serious business! People there really take their biryani to heart. Walk through the streets, and you’ll find countless eateries proudly serving their own style of biryani.
As biryani traveled and spread across regions, many different versions emerged. From spicier varieties like Hyderabadi biryani to milder versions like Sindhi biryani, each region puts its own twist on the dish. You might even hear about special family recipes that have been passed down through generations. It’s amazing how something as simple as rice and meat can take so many forms, each one delicious in its own way!
Making this biryani is easy and involves four main steps. First, you’ll need to parboil the basmati rice, which means cooking it just enough so it stays firm for later. Next, you’ll make the biryani masala. After that, you’ll layer them together. Finally, we’ll seal the pot and use a cooking method called “dum”.
Just follow these simple steps, and your biryani will turn out great! You’re going to love it!
Why You’ll Find This Recipe Super Simple
This is my go-to recipe because of readymade masala, that saves so much of time. I use Shan Bombay Biryani Masala. It’s one of those ready-made spice mixes that takes the guesswork out of cooking. Instead of spending time measuring and mixing a bunch of different spices, you just grab the packet and you’re good to go!
Now, I know some folks, like me, often prefer making spices from scratch. Usually, I’m not the person to recommend store-bought or ready-made masalas in your cooking. But trust me on this one. Shan biryani masala is really top-notch! It gives your biryani an authentic taste without all the hassle.
I’ve made my own biryani masala before, and if you’re interested, I’m happy to share that recipe with you. But the great thing is, you won’t really notice much difference in flavor between using Shan and making your own spice blend. That’s why I recommend it as a time-saver for anyone who wants delicious biryani without a lot of fuss.
However, if you’re the type who loves to make everything from scratch, don’t worry! Just scroll down, and I’ll share the details on how to create your own masala.
So, whether you go with Shan or whip up your own spices, you’ll be set for a fantastic biryani!
How To Make Pakistani Chicken Biryani ( Step-By-Step Guide )
Step 1: Parboil the Rice
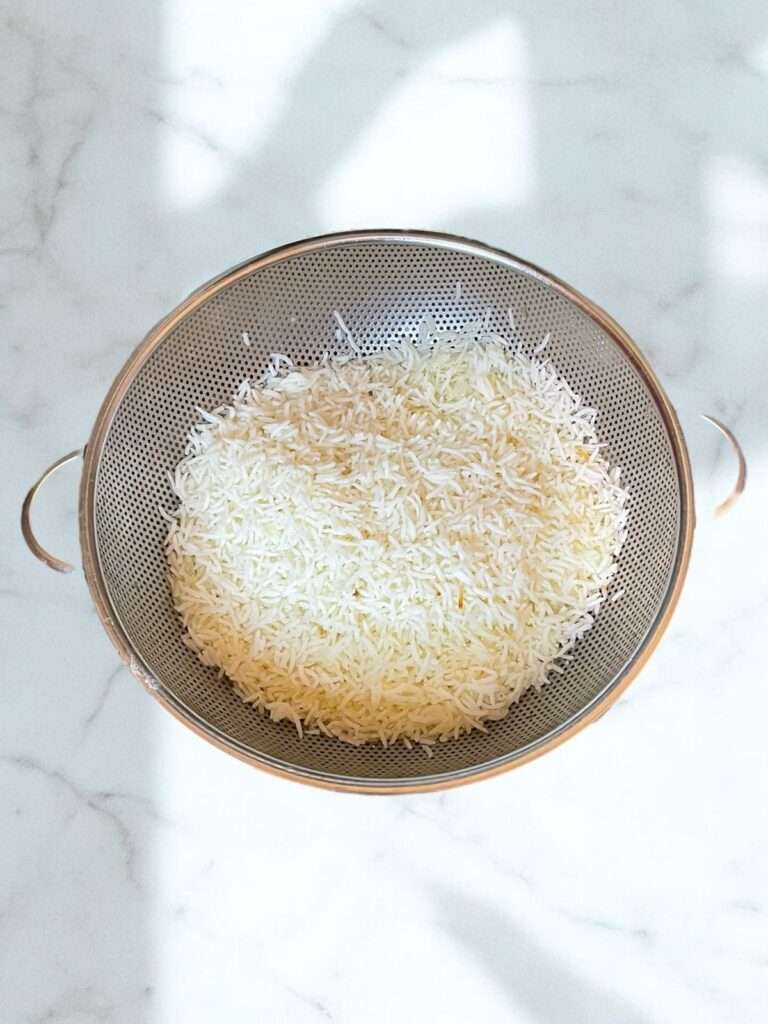
Boil 3 liters of water in a large pot with 3 teaspoons of salt. Add 3 cups of rice and cook until it’s slightly tender but not mushy (about 80% done). Strain the rice and set it aside.
Step 2: Prepare the Biryani Masala
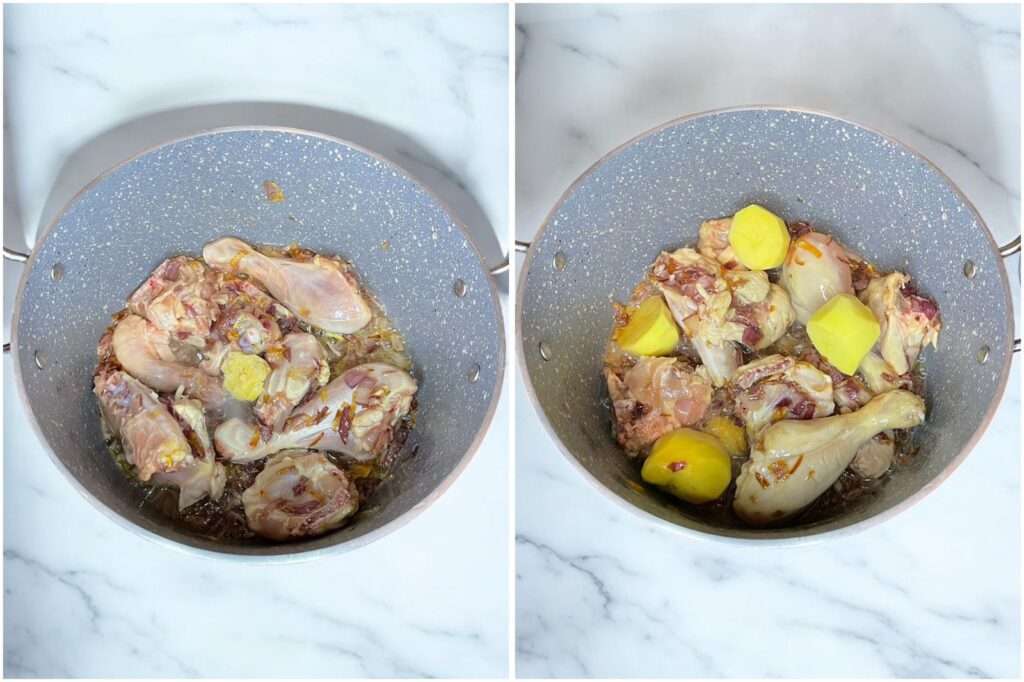
Heat ½ cup of oil in a pan. Fry 1 large chopped onion until golden brown, then add 1 tablespoon of ginger-garlic paste.

Add 800 grams of chicken pieces and cook until they change color, then mix in 3 halved potatoes and cook for 3-5 minutes.
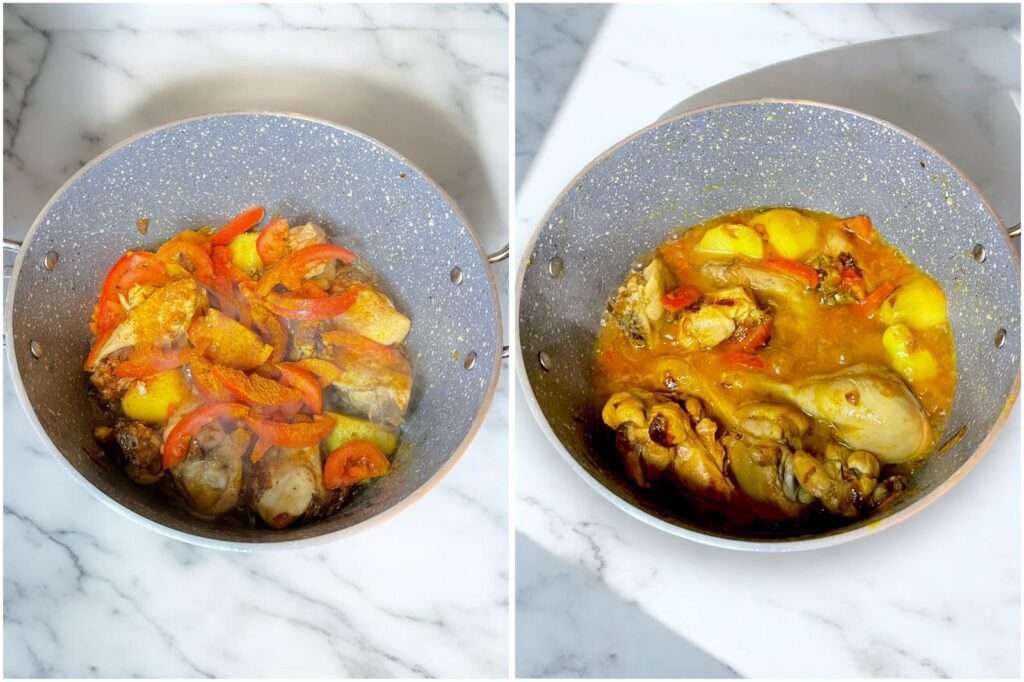
Add 2 chopped tomatoes, 1 teaspoon of salt, ½ teaspoon of turmeric, and 1 teaspoon of red chili powder. Cook until the tomatoes are soft. Now, add ¼ cup of hot water and cover for 5-7 minutes to soften the chicken and potatoes.
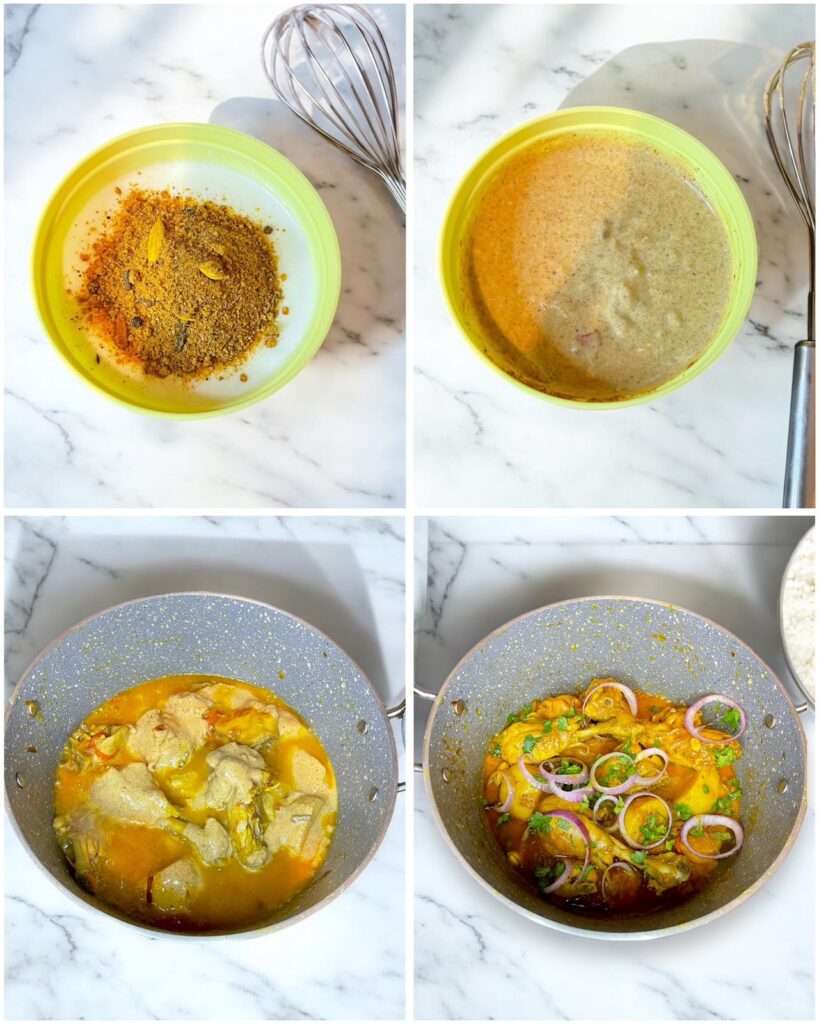
Whisk 1 cup of yogurt with 1 pack of Shan special Bombay biryani masala, and mix it into the chicken when tender. Cook until the oil separates, then add onion rings, green chillies, and cilantro, and turn off the heat.
Step 3: Layer the Biryani
Start with a layer of the chicken mixture in a pot, then add the parboiled rice. Garnish with lemon slices, mint leaves, and a sprinkle of orange food color. Repeat the layers.
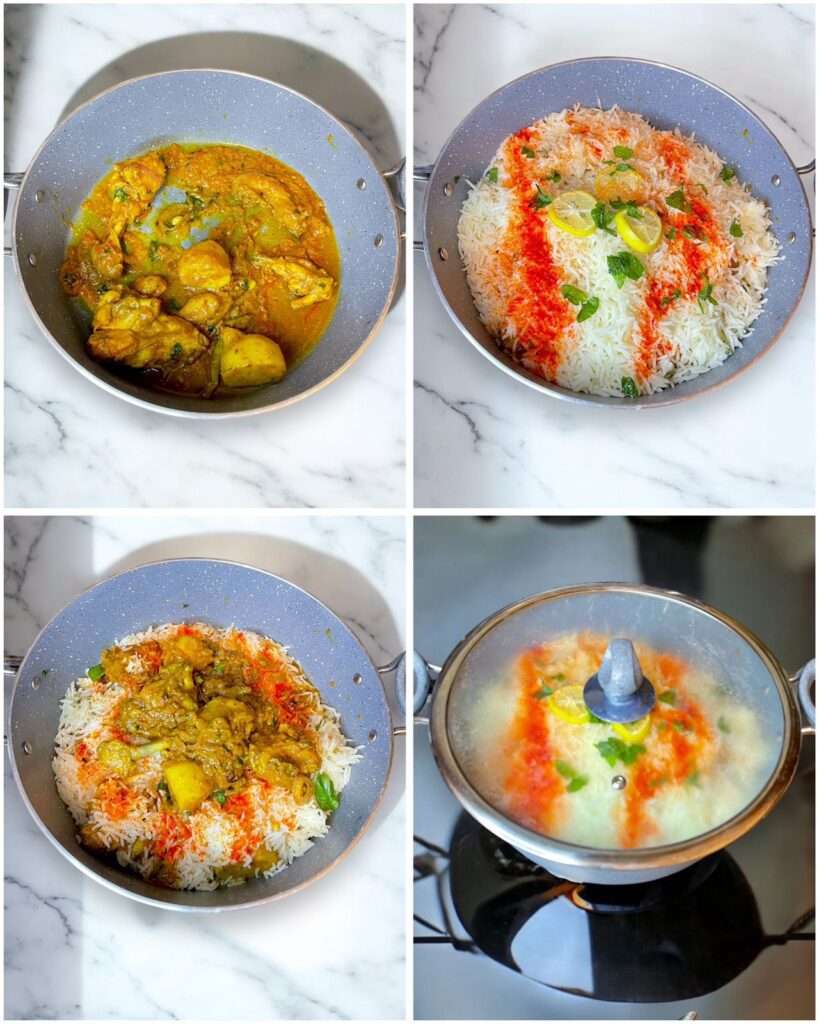
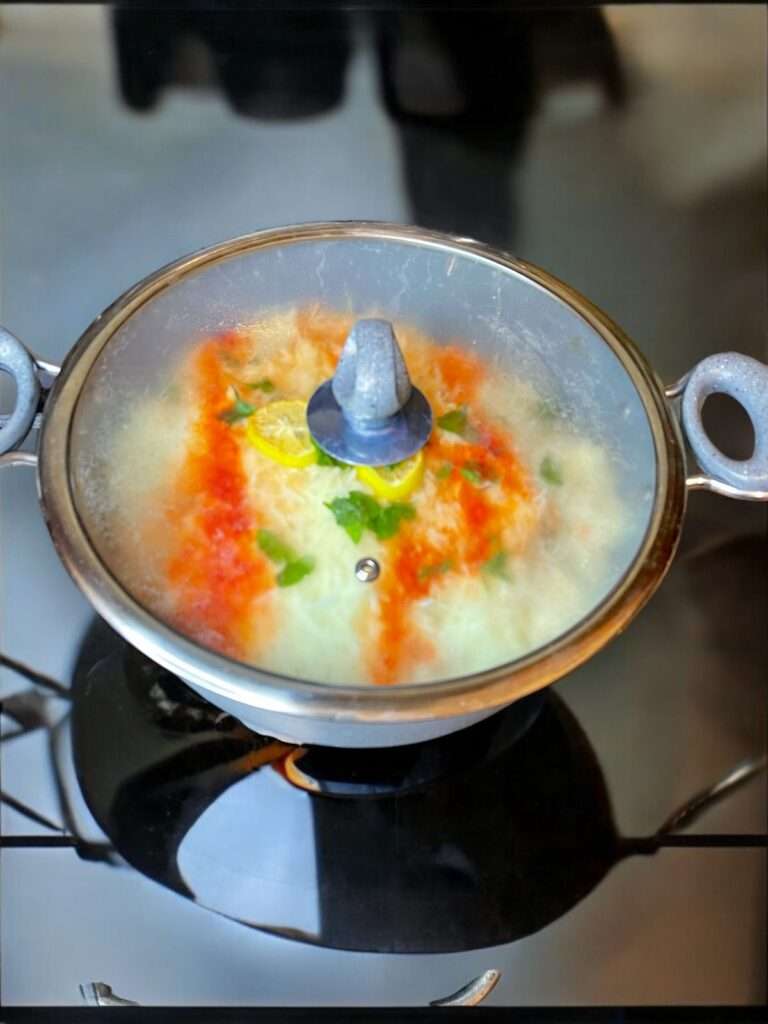
Step 4: Cook on Dum (Steam)
Use a heavy-bottomed pot with a sealed lid to trap steam. Cook on low heat for 25 minutes.
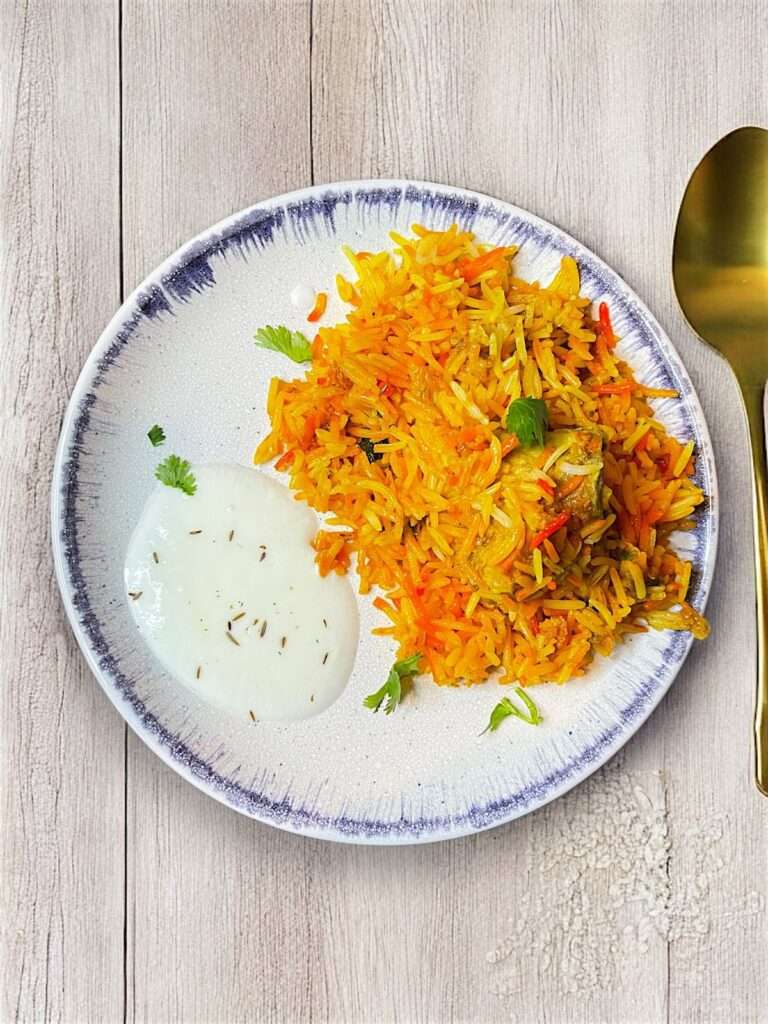
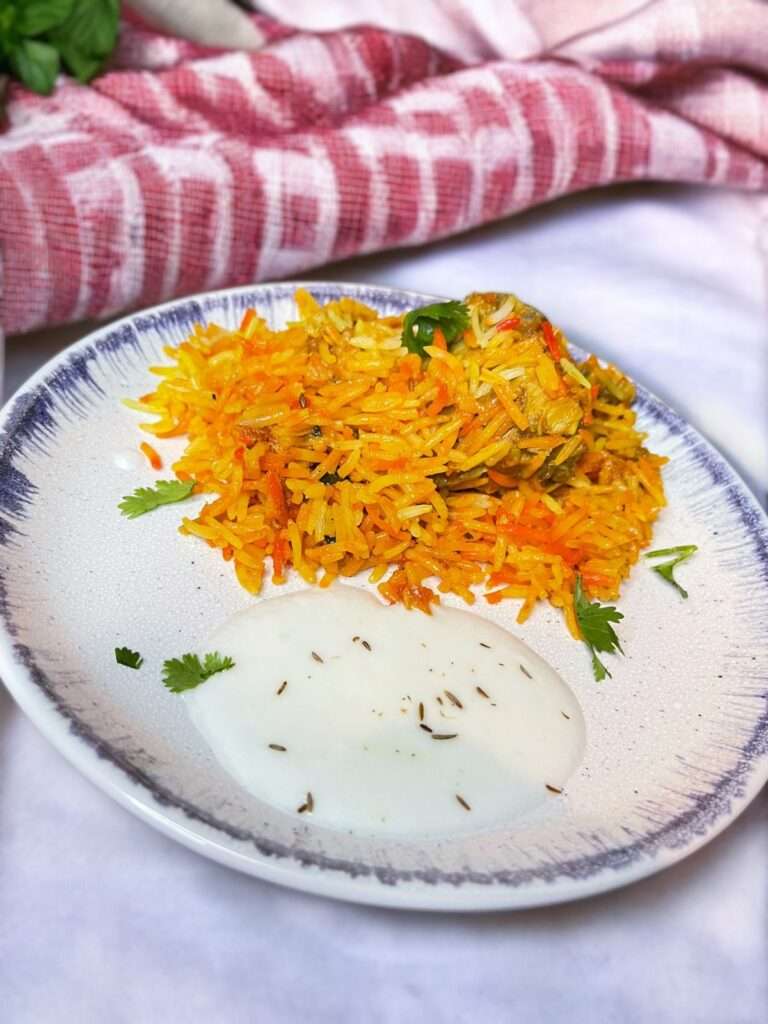
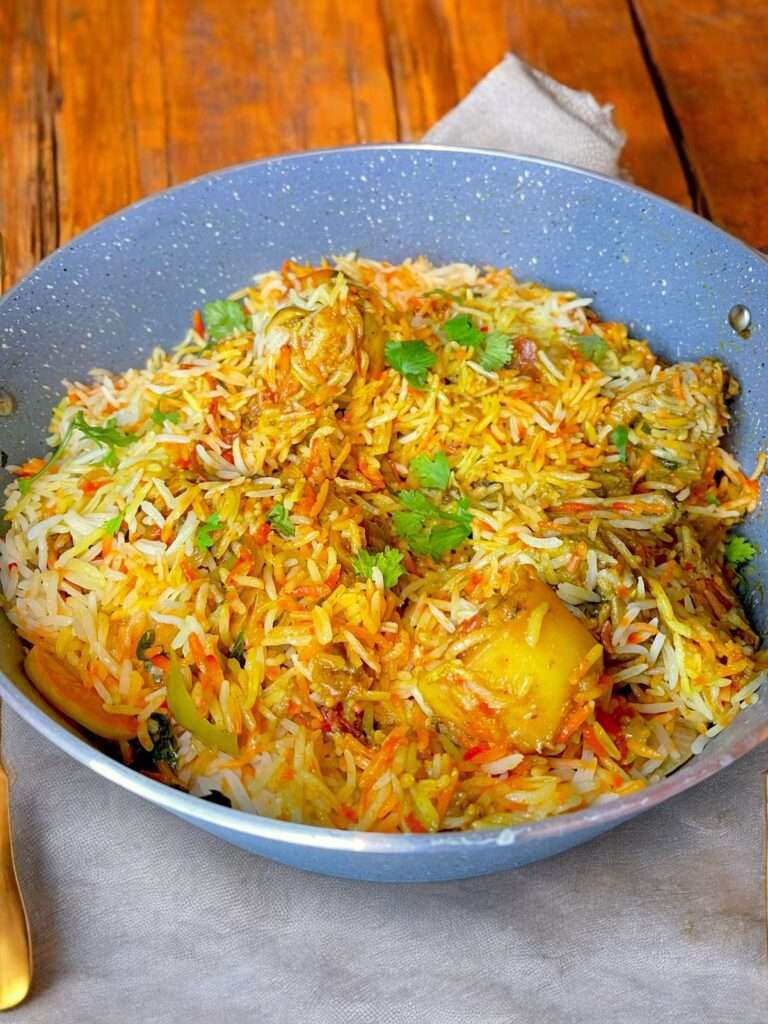
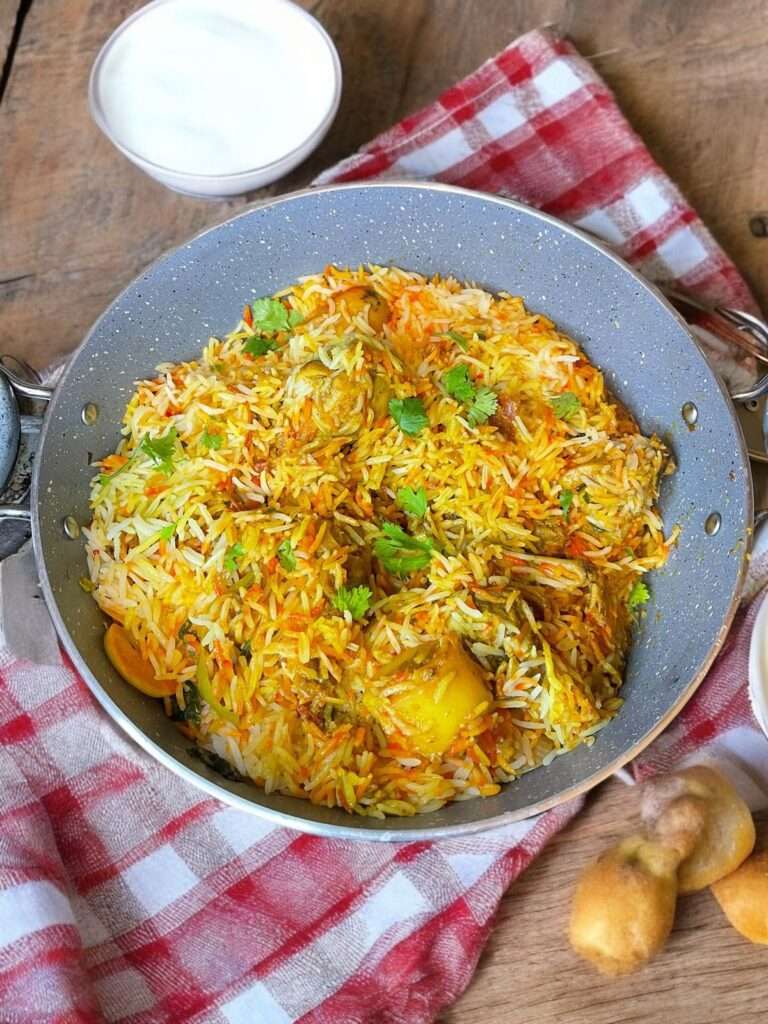
After cooking, gently flip the biryani to mix it. Serve warm with chutney or raita.
What Makes This Recipe Just Right?
- First, you need to know how to keep the rice nice and fluffy. This is super important because nobody likes mushy rice in their biryani. To achieve that perfect texture, always use good quality basmati rice. It makes a huge difference in the final dish!
- Next up is the chicken and potatoes. They need to be cooked properly for the best results. If the potatoes aren’t cooked all the way through, they can be hard and spoil the whole dish.
I remember having biryani that tasted amazing, but when I broke apart the chicken, it was clear something was off, it wasn’t cooked enough. So, make sure both the chicken and potatoes are tender to avoid any disappointments.
- Lastly, let’s talk about the gravy. The consistency of the gravy plays a big role in how the biryani turns out. It shouldn’t be too runny; if it is, when you layer it with the rice, the texture can get all messed up, and it might end up tasting off. Striking the right balance in your gravy is key to making sure every bite of your biryani is delicious!
Tips For Getting The Perfect Texture And Flavor
- The type of rice you use matters a lot! A premium version called sella-basmati is fantastic if you can find it. It’s known for its amazing texture. If that’s not available, try to find aged basmati rice. Avoid simple sella rice, as it doesn’t hold up as well in biryani and can become mushy.
- When it comes to chicken, go for pieces that are cut in medium-sized karahi cuts, not too big. This size helps the chicken cook evenly and ensures it stays tender. If the pieces are too large, they might take longer to cook and can end up being tough.
- Layering your biryani properly makes a huge difference in taste and texture. Start with a layer of biryani masala, then add a layer of rice, and follow it with some garnishes like fried onions or fresh herbs. Repeat this process twice to get those great flavors throughout!
- Be cautious with food colour. Too much can make your biryani look artificial and taste odd. Just a little bit goes a long way in giving it that beautiful color without overpowering everything else.
- Finally, don’t rush the cooking process! After everything is layered, allow it to “dum,” which is sealing the pot and cooking it on low heat, for at least 25 minutes.
Best Pairing For Your Biryani
Biryani is one of those fantastic dishes that stands on its own, so you really don’t need any sides. But if you’re looking for that perfect pairing, I definitely recommend raita. It’s just the classic combo that elevates your meal to another level!
Making raita is super simple. Just take some chopped cucumber and onions, and throw in a handful of fresh mint leaves. Whip up some yogurt and mix it all together. Season with a pinch of salt and some ground cumin seeds, and you’re good to go.
Explore More Pakistani Rice Recipes
Just like this Pakistani chicken biryani recipe is super simple, explore more delicious Pakistani rice recipes! There are some fantastic options that are just as easy to make and full of flavor.
Chicken Yakhni Pulao
Kabuli Pulao
Chana Pulao
Zarda Rice
Special Instructions
- When you’re parboiling your rice, make sure to add some salt to the water. It helps season the rice from the start, which makes a big difference in flavor!
- When you parboil the rice, don’t make the mistake of running it under cold water afterward! One of my friends did that, and it just ruined the texture, so avoid that mistake if you can!
- For a rich and tasty gravy, always go for juicy tomatoes. They add a lot of moisture and flavor to the dish, making it much more delicious.
- If your potatoes are a bit aged and not fresh, it’s a good idea to pre-boil them until they’re about 70% cooked. This way, the rest will be soften up nicely in dum, and won’t be hard when you eat the biryani.
- Fry your onions until they’re nice and brown before adding the chicken. This step is really important because it adds depth of flavor to your dish.
- When using yogurt, make sure to whisk it until it’s smooth and thick. You want it to be creamy, not too runny or lumpy.
- If you notice there’s too much oil sitting in your masala, don’t hesitate to scoop out some before layering. Too much oil can make your biryani greasy.
- When adding food color, opt for orange instead of yellow. It gives your biryani that lovely, appetizing look!
- On opening dum, just give everything a few gentle flips instead of mixing it all together. This keeps the rice and chicken nice and fluffy!
- Always remember to add garnishes to your layers. They give nice aroma and flavor that can be achieved after that.
Perfect Rice To Chicken Ratio
It really depends on how you like your biryani. For me, this is the rice-to-chicken ratio I stick to. This ratio strikes a nice balance, you have enough chicken to complement the rice without it feeling too heavy. However, you can adjust the amounts based on your personal taste!
- For every 3 cup rice, use 800 grams of chicken.
- For every 5 cup rice, use 1200 grams of chicken.
Variations And Substitutions In A Recipe
You can easily switch out the chicken for other types of meat, like beef or mutton, depending on your preference. Just keep in mind that beef or goat meat takes longer to cook than chicken. You’ll need to cook beef or mutton for an additional 50 minutes compared to chicken. To make sure it cooks evenly and gets tender, I recommend partially cooking the meat before adding it to the biryani masala.
Another fun way to change your biryani is by trying different garnishes. I usually use onion rings, fresh mint leaves, and lemon slices. But you can also add lots of nuts, particularly cashews, and crispy fried onions! I don’t use those often because my kids don’t like them, but they really boost the flavor and crunchiness of the biryani. I usually add those toppings when I make beef biryani.
If you want to make your biryani look more colorful and you can’t find orange food color, you can use yellow food color instead. It will still make your dish look nice and appealing!
Homemade Biryani Masala Ingredients
As I mentioned at the beginning of the post, I will share the ingredients for homemade biryani masala. To prepare it, you’ll need a good coffee grinder. First, roast all the spices until fragrant, then add them to the grinder and blend them into a fine powder. Here’s the list of ingredients:
- 2 teaspoons cumin seed
- 1 teaspoon coriander seeds
- 1 teaspoon black peppercorns
- 1-2 green cardamom pods
- 2-3 cloves
- 1 small stick of cinnamon (about 1 inch)
- 1-2 dried red chilies (adjust to spice preference )
- 4-5 bay leaves
- 1 teaspoon ground turmeric
- 1 teaspoon ground nutmeg
- 1 teaspoon ground mace
- 1 teaspoon garam masala (optional)
- 1 tablespoon fennel seeds
- 1 teaspoon carom seeds
- 1.5 teaspoon salt (or adjust to taste)
- 1 cup dried plum

Pakistani Chicken Biryani Recipe (Easy One)
Course: MainCuisine: Pakistani8
servings40
minutes1
hour10
minutes480
kcal1
hour50
minutesTry this easy Pakistani Chicken Biryani recipe! It’s a delicious mix of tender chicken, flavorful spices, and fluffy rice, perfect for family dinners or special occasions. Follow these simple steps to make a tasty biryani that everyone will enjoy!
Ingredients
- Biryani Masala
800 grams chicken, karahi cut (medium pieces)
½ oil
1 large size onion, chopped
2 medium size tomatoes, chopped
1 tablespoon ginger-garlic, paste
3 medium size potatoes, cut into half
1 teaspoon salt
½ teaspoon turmeric powder
1 teaspoon red chili powder (optional)
1 cup yogurt, thick creamy
1 pack shan special Bombay biryani masala
4 green chillies, sliced
1 small onion, rings
Handful of cilantro, chopped
- For making rice
3 cups rice, boiled
3 teaspoon salt
3 liters of water
- Layering/ Garnish
2-3 lemons, sliced
½ cup mint leaves
1 teaspoon orange food color
Directions
- Parboil the Rice
- Start by boiling 3 liters of water in a large pot. Add 3 teaspoons of salt to the boiling water. Pour in 3 cups of rice. Cook the rice until it’s soft but still holds its shape (about 80% cooked). You’ll know it’s ready when it’s slightly tender but not mushy. Once ready, carefully strain the rice and set it aside. It will finish cooking later.
- Prepare the Biryani Masala
- In a pan, heat ½ cup of oil over medium heat. Add 1 large chopped onion to the hot oil. Fry it until it turns a nice golden brown color.
- Once the onions are golden, add 1 tablespoon of ginger-garlic paste. Stir it well and cook for a minute.
- Next, add the 800 grams of chicken pieces. Fry the chicken until it changes color and is no longer pink.
- After the chicken is cooked, add 3 medium-sized potatoes, cut in half. Keep frying for about 3-5 minutes.
- Now toss in 2 chopped tomatoes along with 1 teaspoon of salt, ½ teaspoon of turmeric powder, and 1 teaspoon of red chili powder (if you want it spicy). Cook this mixture until the tomatoes are soft.
- Make sure the chicken and potatoes are cooked through. Add about ¼ cup of hot water to help them cook.
- Cover the pan with a lid and let it cook for 5-7 minutes. This helps tenderize the chicken and potatoes.
- While the chicken is cooking, whisk 1 cup of thick creamy yogurt in a bowl to make it smooth. Add 1 pack of Shan special Bombay biryani masala into the yogurt and mix well to avoid lumps.
- When the chicken is tender and water has mostly dried up, stir the yogurt and masala mixture into the chicken gravy.
- Keep cooking on medium to high heat, stirring until the oil starts to separate from the mixture.
- Finally, add onion rings, sliced green chillies, and a handful of chopped cilantro. Turn off the heat.
- Layer the Biryani
- Start layering your biryani. Begin with a layer of the chicken masala mixture on the bottom.
- Next, add the parboiled rice on top.
- For garnish, add slices of lemons, mint leaves, and sprinkle of orange food colour over the rice.
- Repeat this layering process one more time.
- Cook on Dum (Steam)
- Make sure you use a pot with a heavy bottom to prevent burning. Seal the pot with a lid to trap the steam inside. You can also use a kitchen cloth around the lid for a better seal.
- After 25 minutes, turn off the heat and carefully open the lid. Gently flip the biryani to mix the layers.
- Serve it warm with yogurt, chutney or raita.
Notes
- If your potatoes are a bit aged and not fresh, it’s a good idea to pre-boil them until they’re about 70% cooked.
- If you notice there’s too much oil sitting in your masala, scoop out some before layering. Too much oil can make your biryani greasy.
- On opening dum, just give everything a few gentle flips instead of mixing it all together.


Your recipes are always very accurate and easy to follow. Thank you !
Thank you! ♥️